Sharpen a nakiri on a water stone at roughly 15° per side, with the blade held level the whole way across — no rocking, no lifting the handle at the tip. Its edge is dead flat, which removes the single hardest part of sharpening a chef's knife. Use light pressure, finish at 6000 grit or finer, and never put a nakiri through a carbide pull-through.
Most Western-market nakiri are double-bevel— ground on both sides — so you treat them symmetrically. The thin blade is the thing to respect: the MAC JU-65 is a 2.5 mm spine, and a Shun Classic nakiri runs a VG-MAX core at ~HRC 60–61 behind ~16°. Thin and hard means keen, and it also means an edge that chips if you lean on it or twist it. What is a nakiri knife covers the shape, and single bevel vs double bevel is worth checking first if yours is one of the rarer single-bevel styles — that is a different job entirely.
What a nakiri's geometry changes
- The edge is flat, so the stroke is flat. On a chef's knife you lift the handle through the curved belly to keep the contact point tracking the edge. A nakiri has no belly. Keep the blade level and push straight — the whole edge contacts the stone at the same angle, which is why a nakiri is a genuinely good knife to learn freehand sharpening on.
- The blade is tall. A 6.5-inch nakiri is roughly twice the height of a paring knife, so your fingers sit well clear of the stone and the blade is easy to hold at a consistent angle. This is an advantage, not a nuisance.
- The tip is square, not pointed. There is no delicate point to round off, but the corners at tip and heel are easy to miss. Deliberately include both ends of the edge in your strokes.
- The steel is thin. Less metal behind the edge means less margin for heavy pressure. Light strokes, more of them. Blade geometry is the mechanism behind why thin cuts better and tolerates less.
What to look for in a stone for it
A nakiri wants a 1000-grit stone to set the edge and a 6000-grit or finer stone to refine it, because hard Japanese steel takes and holds a very fine finish that softer German steel cannot. Sharpening stone grits explained is the grit scale. A combination stone covers both in one block; a splash-and-go ceramic stone saves the soak if you sharpen on impulse. Three options from the registry are below, with live prices, and stones for Japanese knives ranks the full shortlist.
The short answer
Quick picks
#ad · Live prices from the Amazon Product API, as of October 17, 2026. Where we have no verified live price we show none — we'd rather leave a gap than print a number that has rotted.
By the numbers
The specs, side by side
Every figure below is the manufacturer's published specification. Where a maker doesn't publish a value, the cell reads "—" rather than a number we made up.
Step by step
How to do it
01
Prepare the stone and set up a stable station
Soak a soaking stone until the bubbles stop (about 5-10 minutes for a King KDS); just splash a splash-and-go stone like the Shapton Kuromaku. Set the stone on a non-slip base or a damp towel, long axis running away from you, with the coarse side up if the knife is dull.
02
Check whether the edge is dull or damaged
Look along the edge under a light. A dull nakiri shows a bright reflective line; a chipped one shows notches. If there are chips, you need a coarser stone and a repair pass first — a 1000-grit stone will take a long time to grind past real damage.
03
Set about 15 degrees per side
Lay the blade flat on the stone, then lift the spine to roughly 15 degrees — about the height of two stacked coins under the spine of a tall blade. Match the factory grind rather than guessing: 15 degrees suits most nakiri, and a Shun Classic nakiri is ground at about 16.
04
Push flat, heel to tip, with no rocking
With light, even pressure, push the edge across the stone as if shaving a thin layer off it. Keep the blade level the entire way — unlike a chef's knife, you do not raise the handle, because the nakiri's edge is straight. Cover the full edge in two or three overlapping sections if the blade is longer than your stroke.
05
Include the square corners at both ends
A nakiri's heel and tip are right-angle corners that sit at the ends of the flat edge and are easy to skip. Finish each pass with a short deliberate stroke at each end so the corners get the same attention as the middle.
06
Work until a burr runs the full length
Sharpen one side until you can feel a tiny wire burr along the entire opposite edge with a fingertip drawn away from the edge — never along it. A continuous burr from heel to tip is proof the two bevels have met at a fresh apex. A patchy burr means you have missed a section.
07
Match the second side exactly
Flip the knife and repeat at the same angle with the same number of strokes until the burr flips to the first side. Keeping stroke counts equal is what keeps a double-bevel edge centered — and on a thin nakiri, an off-center edge steers in the cut.
08
Refine on 6000 grit or finer
Move to the fine stone and make a few light alternating passes per side at the same angle. Hard Japanese steel takes a genuinely polished finish here, and a polished apex is what gives a nakiri its falling-through-a-carrot feel.
09
Strip the burr and test
Finish with a few very light edge-trailing alternating strokes, or strop on leather or cardboard, to remove the last of the wire edge. Test on paper: a sharp nakiri should slice cleanly with no tearing. Rinse and dry the blade fully — thin hard steel and standing water are a bad combination.
In detail
The picks, in full
Splash-and-go with no soaking
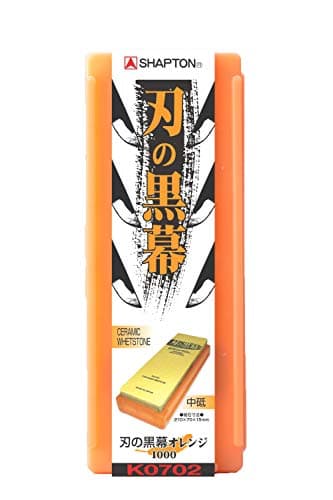
Shapton Kuromaku 1000-Grit Ceramic Whetstone
Ceramic1000Splash-and-goHard-wearingCase included
A hard ceramic splash-and-go stone. Faster, harder-wearing and cleaner to use than a soft soaker.
- Cutting speed
- 9
- Feedback
- 8
- Durability
- 9
- Beginner-friendly
- 7
- Value
- 7
Pros
- +No soaking — a splash of water and it's ready, which removes the biggest barrier to sharpening often
- +Hard binder stays flatter far longer than a soft King, so less flattening
- +Cuts quickly and cleanly on both German and Japanese steels
Cons
- −Single grit — you'll want a finishing stone or a strop to go with it
- −One grit for a similar outlay to a King combination's two, so grits-per-dollar is poor
- −Harder stones give less of the tactile 'feedback' beginners learn from
Don't buy this if…
…you're on your very first stone. The King combination teaches the skill better and throws in a 6000 finishing side; graduate to a Shapton once you know you'll keep sharpening and the soaking is what's stopping you.
The best first whetstone
King KDS 1000/6000 Combination Whetstone
Water stone1000 / 6000ComboSoakStone only
The whetstone that has taught more people to sharpen than any other. Cheap, forgiving, and it just works.
- Cutting speed
- 7
- Feedback
- 9
- Durability
- 6
- Beginner-friendly
- 10
- Value
- 10
Pros
- +The classic learn-to-sharpen stone: soft, fast-cutting, and endlessly forgiving of a wobbly angle
- +1000 and 6000 grit covers the whole home-cook job — set an edge, then polish it
- +A thick 1½-inch block — years of stone to wear down and re-flatten
Cons
- −Soft binder dishes (hollows out) quickly — you'll need to flatten it regularly
- −Requires a proper soak before use, so it's not grab-and-go
- −Sold as the bare stone — no base or holder, so you'll need a damp towel or a stand
- −Wears faster than a hard ceramic or diamond stone
Don't buy this if…
…you want a splash-and-go stone you never have to soak or flatten. The Shapton or a diamond plate is the lower-maintenance answer — neither asks you to soak it or level it.
Refining an already-sharp edge
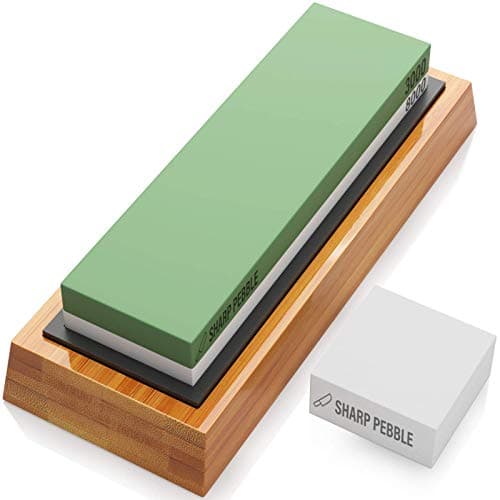
Sharp Pebble 3000/8000 Combination Whetstone
Water stone3000 / 8000ComboBamboo baseFlattening stone
Not a first stone — a finishing one. When a 6000-grit edge isn't keen enough, this takes it to a polished, push-cutting finish, and it ships with a flattening stone.
- Cutting speed
- 4
- Feedback
- 7
- Durability
- 6
- Beginner-friendly
- 6
- Value
- 8
Pros
- +3000 then 8000 takes an edge past a working sharpness to a genuinely polished, refined finish
- +Includes a dual-grit flattening stone, which is exactly what a soft finishing stone needs to stay true
- +The finishing pair a keen-knife enthusiast reaches for after a 1000/6000
Cons
- −These are polishing grits — they remove almost no metal, so this can't sharpen a dull knife on its own
- −Pointless without a coarser stone first; on its own it does nothing for an edge that isn't already sharp
- −The extra refinement is invisible to most home cooks in everyday cutting
Don't buy this if…
…you only own one stone and want it to do everything. This is a second stone for polishing; buy a 1000/6000 first and add this only if you've caught the sharpening bug.
Never a pull-through, and be careful with electrics
A carbide pull-through sharpener grinds a coarse, wide, preset angle and tears off far more metal than a stone. On a thin 2.5 mm nakiri that is not a compromise, it is damage — you will have paid for a thin Japanese blade and then put a 20°-plus German edge on it. Most electric sharpeners are set for wider Western angles too; if you will not use a stone, a guided system that lets you set the angle is the lesser evil. See guided vs freehand sharpening and best sharpening systems.
Between sharpenings: ceramic, not steel
A nakiri at ~HRC 60 does not want a cut-steel honing rod bending its edge around. Use a fine ceramic rod, lightly, and only every few sessions — ceramic vs steel honing rod explains why, and how often should you sharpen a knife sets the interval. Keep it to vegetables: no bone, no frozen food, no scraping the board with the edge. A nakiri is a vegetable knife by design, and respecting that is most of its maintenance.
If the edge chips instead of dulling
Thin hard steel chips rather than rolls, so a nakiri's failure mode looks different from a German knife's. Small chips grind out on a coarse stone; anything deeper than about half a millimeter means re-establishing the bevel across the whole edge. How to fix a chipped knife edge is the repair, and how many times can a knife be sharpened puts the metal loss in perspective.
The santoku and gyuto next to it
If you also own a santoku, the method is nearly identical but the santoku has a slight belly, so the handle lifts a little toward the tip — how to sharpen a santoku knife is that version. A gyuto behaves like a chef's knife; see how to sharpen a chef's knife. And if you are still deciding whether the nakiri earns its drawer space, is a nakiri worth it is the honest answer.
How we picked
We do not run a test kitchen
We compiled each product's published specifications — steel, hardness, edge geometry, weight — normalized them into the matrix above, and scored each one against a published rubric. The scores are judgments from those specs and the value math — they are not measurements we took, because we do not have a test kitchen and we're not going to pretend we do. Units we claim to have tested: 0.
Questions
Frequently asked
What angle do you sharpen a nakiri at?+
About 15° per side for a standard double-bevel nakiri — lower than the ~20° used on a German knife, because the harder, thinner Japanese steel supports a keener edge. A Shun Classic nakiri is factory-ground at about 16°; match the maker's figure where it is published.
Is a nakiri hard to sharpen?+
It is easier than a chef's knife. The edge is dead flat, so you hold one angle and push straight instead of rocking through a curved belly. The tall blade also keeps your fingers clear of the stone.
Is a nakiri single or double bevel?+
Almost every nakiri sold in the West is double-bevel and sharpened symmetrically on both sides. Single-bevel versions exist in traditional Japanese lines and are sharpened very differently.
Can you sharpen a nakiri with a pull-through sharpener?+
You should not. Pull-throughs set a coarse, wide, preset angle and remove a lot of metal, which destroys the thin low-angle edge that makes a nakiri worth owning. Use a water stone, or a guided system if you will not.
What grit stone for a nakiri?+
1000 grit to set the edge and 6000 or finer to refine it. Hard Japanese steel takes a polished apex that softer German steel cannot hold, so finishing fine is worth the extra two minutes here.
Receipts
Sources
We do not run a test kitchen, and we do not pretend to. Specs are the manufacturer's published figures, attributed as such; where we could not verify something, we say so on the page rather than quietly leaving it out. Read our full method.